
tea for one

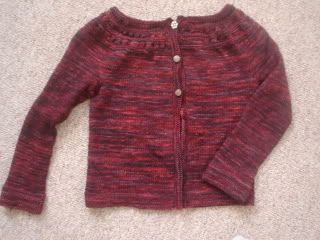
dorky FO self-portrait
i'll be leaving town tomorrow to drive down to kansas city (9 hours! both ways!) for my sister-in-law's wedding.  in preparation, i've been trying to get projects off the needles and amass the ones that have been languishing - the theory is that i can finish them in the car, and then when we return to chicago next week, i can start a whole bunch of new and exciting projects.  whether or not this scheme will actually work remains to be seen, but in any case, i did finally finish my tea leaves cardigan!

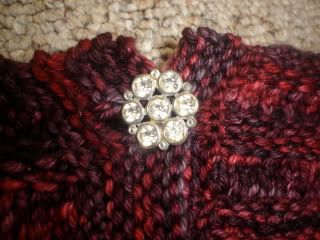
it was a tough choice, deciding which buttons to use from my stash, but finally i settled on some vintage buttons i've been saving for the right project.  i don't think i'll ever make another sweater worthy of these buttons, to be perfectly honest.  they're a bit on the fancy side, but i think they really complement the color and the pattern. 
fancy top button!

as mentioned in previous posts, i used malabrigo rios (color: cumparsita) instead of the madelinetosh dk called for in the pattern.  i didn't have to change needle sizes at all to get gauge, so the entire time i just followed the instructions for my true size.  the only modifications i made were to make the body of the sweater and the sleeves a little longer, because i like it that way!  i added an extra inch of stockinette after the sleeve decreases, and an extra 2 rows of garter at the sleeve cuffs; i also added an extra inch (or inch and a half - now i don't remember) to the body, although i didn't add any rows of garter at the bottom edge. 

i also added a buttonhole to the band, which necessitated a slight modification in the spacing of the buttonholes - i think i decided to have only 12 stitches between each buttonhole, when it was all said and done.
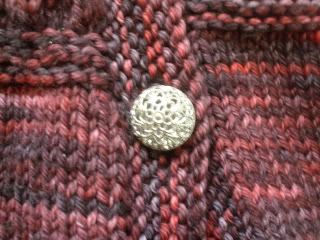
the other two buttons are also fancy!

it's a good thing i picked up a 'safety skein' the last time i was at nina - i ended up dipping into it for the sleeves - so if you want to make a rios version of this on the smaller side, you will need 5 skeins -  i had a little less than half of that fifth skein left over.  because i had 2 different dye lots, i alternated skeins every few rows when knitting the body.  i got a little tired of that when it came time to knit the sleeves, but luckily you can't tell the difference! 

i loved this pattern - easy to follow, easy to modify, and it's a pretty fast knit - i think that, if i had been less distracted by other projects, i could have easily made this sweater in a few weeks.  at any rate, this is my new favorite hand-knit sweater - i can't stop wearing it!  i still haven't blocked it after finishing it - i really want to, but then i'd have to wait two or three days to wear it again.  maybe when we get back from our trip...

not blocking...just rockin'.

Comments

  1. Love the colour!!
    Hope your sister had a great wedding!
    There's an award for you in my blog :)

    ReplyDelete

Post a Comment

Popular posts from this blog

Easy DIY: Beaded Vintage Snowflake Ornament Kits from Solid Oak Inc.

I was really excited to step outside of my comfort zone and try something new as part of my "Christmas in July" theme this month. The kind folks at Solid Oak Inc offered me a chance to review one of their Nostalgic Christmas beaded crystal ornament kits I couldn't resist. My tree is already full of ornaments I've inherited or been gifted from other family members and friends,  so these pretty crystal beaded ornaments will fit right in I think! I was super impressed with  this compact little kit , which includes everything needed to create three gorgeous vintage-style ornaments - just add a pair of round nose pliers (I found mine on Amazon for less than ten bucks).  The instructions had some fabulous tips for newbies like me; for example, it recommended sorting the beads and laying them out in order on a towel or beading mat to prevent them from rolling away. That may seem obvious, but I was totally ready to start beading on my kitchen table without a

What If I Didn't Add Heels?

Last weekend, I finished the first sock with my Waterlilies yarn , and just for yuks, I tried it on even though it was basically just a tube sock. Much to my surprise, it fit really well, even without a heel. Who knew? So, that got me thinking: what if I just didn't add the heels?  I never thought a tube sock would actually fit nicely, but I genuinely like the fit, so...why spend time to add the heels? As the saying goes, if it ain't broke, don't fix it.... Let's say I decide not to add heels once the second sock is done - there will still be placeholder yarn for the afterthought heels, as you can see above, so should I leave it in and just weave in the ends? Or should I remove it, put the live stitches back on needles and at least graft them together using more of the Waterlilies yarn? I plan on mulling all of this over as I knit the second sock, and I'd love to hear your opinions of what you think would look best (or if you think this whole "n

Overdyeing A Finished Knit

Even after just a few years of knitting or crocheting, you're bound to have some finished projects lying around that never get worn or used. After 10+ years of crafting, I have more than just "some" or "a few"....and with my ongoing quest to declutter my house this year, I've become obsessed with going through these forlorn projects and making some Big Decisions. Sometimes, they are perfectly fine and just need a new and loving home. Other projects may have not turned out quite right: there might have been some mistakes in the knitting that I thought I could live with, or the yarn was gorgeous but not well-matched to the pattern, or my  taste has drastically changed since I finished making the project...in any case, why on earth did I keep knitting?! Who knows, but I don't feel good about gifting anything that falls into this category to someone else. These projects have been relegated to the "frog pile" (or should I say, frog pond?), to b