
Malabrigo Sale Alert + FO Friday

Happy FO Friday! I finished my first project from Amigurumi On The Go, which I bought recently via Craftsy Deals. This is the Cat Roundie Bag, which I modified a bit, mostly because I didn't want to sew on pieces of felt. Instead, I decided to crochet as many features as possible and embroider the rest. Below is what I did if you decide you'd like to do the same!

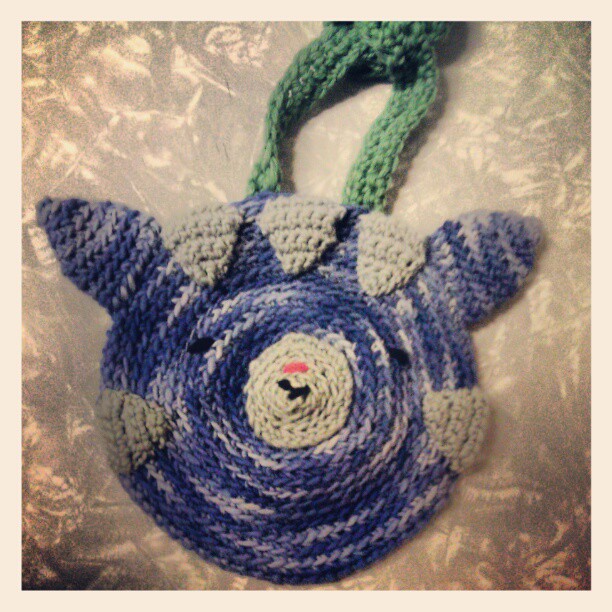
The main yarn used is a lovely space-dyed purple from Manos Del Uruguay (just in time for their Fair Trade February celebration!); the contrasting colors are all bits and bobs from my amigurumi stash. This was a very quick project to make, though I highly recommend blocking the finished pieces (especially the round bag pieces) so that they lay nice and flat.


Modifications - To Make Cat Features
Cat Muzzle: Work first 6 rnds of bag front instructions in contrasting color. Fasten off.

Cat Triangles (worked flat - make 5):

Ch 2.
Row 1: SC 3 sts into second stitch from hook.
Row 2: CH 1, SC 3 sts.
Row 3: CH 1, SC 2 sts into first st, sc 1 st, sc 2 sts into last st.
Row 4: CH 1, SC 5 sts.
Row 5: CH 1, SC SC 2 sts into first st, sc next 3 sts, sc 2 sts into last st.
Row 6: CH 1, SC 7 sts.
Fasten off.

Attach pieces to bag front. Embroider eyes, nose and mouth as you see fit!

Did somebody Say 'Malabrigo Sale?' 

Why wait til Malabrigo March is here? The early bird gets the skein of yarn! Right now, Doodlebug Yarn has marked down all of their luscious, lovely mmmmmmMalabrigo - they even have some Finito left in stock! I just placed my own order, so it's safe to enable spread the word. Don't forget to enter "HBSBLOG" at checkout to receive $5 off your order of $25 or more! 


Celebrate FO Friday by checking out more posts over on the Tami's Amis blog! Have a crafty weekend!

Comments

  1. Oooo! Thanks for the hot-tip on the Malabrigo sale. :-D The bag looks adorable.

    ReplyDelete
  2. Lovely!! Thanks for sharing the modifications to make a cat.

    Here's my FO: http://mibruno.com/terminado-35/

    ReplyDelete
  3. Awesome, thanks for sharing your FO, too!

    ReplyDelete

Post a Comment

Popular posts from this blog

Easy DIY: Beaded Vintage Snowflake Ornament Kits from Solid Oak Inc.

I was really excited to step outside of my comfort zone and try something new as part of my "Christmas in July" theme this month. The kind folks at Solid Oak Inc offered me a chance to review one of their Nostalgic Christmas beaded crystal ornament kits I couldn't resist. My tree is already full of ornaments I've inherited or been gifted from other family members and friends,  so these pretty crystal beaded ornaments will fit right in I think! I was super impressed with  this compact little kit , which includes everything needed to create three gorgeous vintage-style ornaments - just add a pair of round nose pliers (I found mine on Amazon for less than ten bucks).  The instructions had some fabulous tips for newbies like me; for example, it recommended sorting the beads and laying them out in order on a towel or beading mat to prevent them from rolling away. That may seem obvious, but I was totally ready to start beading on my kitchen table without a

What If I Didn't Add Heels?

Last weekend, I finished the first sock with my Waterlilies yarn , and just for yuks, I tried it on even though it was basically just a tube sock. Much to my surprise, it fit really well, even without a heel. Who knew? So, that got me thinking: what if I just didn't add the heels?  I never thought a tube sock would actually fit nicely, but I genuinely like the fit, so...why spend time to add the heels? As the saying goes, if it ain't broke, don't fix it.... Let's say I decide not to add heels once the second sock is done - there will still be placeholder yarn for the afterthought heels, as you can see above, so should I leave it in and just weave in the ends? Or should I remove it, put the live stitches back on needles and at least graft them together using more of the Waterlilies yarn? I plan on mulling all of this over as I knit the second sock, and I'd love to hear your opinions of what you think would look best (or if you think this whole "n

Overdyeing A Finished Knit

Even after just a few years of knitting or crocheting, you're bound to have some finished projects lying around that never get worn or used. After 10+ years of crafting, I have more than just "some" or "a few"....and with my ongoing quest to declutter my house this year, I've become obsessed with going through these forlorn projects and making some Big Decisions. Sometimes, they are perfectly fine and just need a new and loving home. Other projects may have not turned out quite right: there might have been some mistakes in the knitting that I thought I could live with, or the yarn was gorgeous but not well-matched to the pattern, or my  taste has drastically changed since I finished making the project...in any case, why on earth did I keep knitting?! Who knows, but I don't feel good about gifting anything that falls into this category to someone else. These projects have been relegated to the "frog pile" (or should I say, frog pond?), to b