My First Opposing-Ply Handspun Yarn

Do you ever come across something at exactly the right time? That's how I feel about spinning opposing-ply yarns. This is something I first heard about on the We Are Yarn podcast, and since then I've noticed other mentions here and there, to the point where I knew I had to try it for myself.

Spinning 101 dictates that yarns are balanced by spinning singles in one direction and plying them in the opposite direction (i.e., two Z-twist yarns would be plied into an S-twist yarn). So what happens when you ply one Z-twist with one S-twist yarn into either of those directions? The answer is as varied as your handspun, however, and there is an entire chapter in the Spinner's Book of Yarn Designs devoted to the subject.


When I ordered these 8 ounces of Superwash BFL from Nerd Girl Yarns in the #hashtag colorway, I knew I wanted to make something special with them. My hope was to get a sport-ish weight yarn which could be used for socks, and when I was reading about the increased durability that opposing-plied yarn offers, I knew that everything had come together at exactly the right time to create the perfect project! 
Dividing the fiber by weight
Like most spinners, I usually spin my singles clockwise (with a Z twist) and then ply them together counter-clockwise (with an S twist). I was pretty sure this would be a difficult habit to break, so I took no chances when spinning my "oddball" S-twist single:


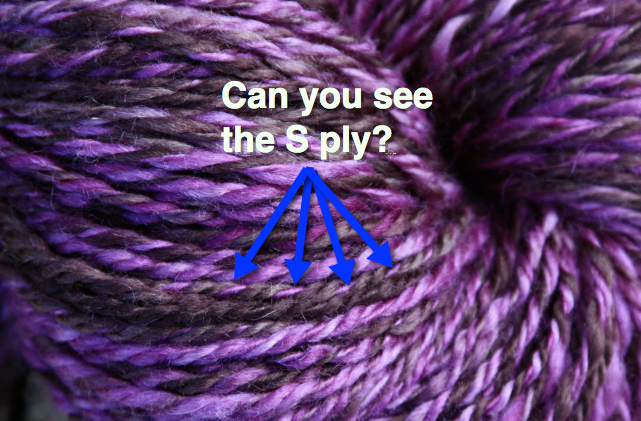
In my experiment, I decided to spin two Z singles and one S single to create a 3-ply yarn; the two singles plied in the same direction plied themselves around the oddball ply in a really interesting way:


As I spun, it seemed as though the Z plies were wrapping around the S ply (ie, the twist was not affecting the S ply, but the Z plies were twisting around it as it stayed static, if that makes sense). You may have to click the image above to enlarge it in order to see what I'm talking about, but if you look closely, you can definitely identify the plies in the skein. 


This is the first project I plied on my new Bulky Flyer for my Ladybug Wheel, which I blogged about in greater detail earlier this week (click here to check it out)! The result was one gorgeous mega-skein of yarn:

It's approximately 215 yards of sport(ish) weight yarn, and I'm definitely going to make myself some socks with it later this year!

Comments

Popular posts from this blog

Overdyeing A Finished Knit

Even after just a few years of knitting or crocheting, you're bound to have some finished projects lying around that never get worn or used. After 10+ years of crafting, I have more than just "some" or "a few"....and with my ongoing quest to declutter my house this year, I've become obsessed with going through these forlorn projects and making some Big Decisions. Sometimes, they are perfectly fine and just need a new and loving home. Other projects may have not turned out quite right: there might have been some mistakes in the knitting that I thought I could live with, or the yarn was gorgeous but not well-matched to the pattern, or my  taste has drastically changed since I finished making the project...in any case, why on earth did I keep knitting?! Who knows, but I don't feel good about gifting anything that falls into this category to someone else. These projects have been relegated to the "frog pile" (or should I say, frog pond?), to b...

Easy DIY: Beaded Vintage Snowflake Ornament Kits from Solid Oak Inc.

I was really excited to step outside of my comfort zone and try something new as part of my "Christmas in July" theme this month. The kind folks at Solid Oak Inc offered me a chance to review one of their Nostalgic Christmas beaded crystal ornament kits I couldn't resist. My tree is already full of ornaments I've inherited or been gifted from other family members and friends,  so these pretty crystal beaded ornaments will fit right in I think! I was super impressed with  this compact little kit , which includes everything needed to create three gorgeous vintage-style ornaments - just add a pair of round nose pliers (I found mine on Amazon for less than ten bucks).  The instructions had some fabulous tips for newbies like me; for example, it recommended sorting the beads and laying them out in order on a towel or beading mat to prevent them from rolling away. That may seem obvious, but I was totally ready to start beading on my kitchen table without a...

What If I Didn't Add Heels?

Last weekend, I finished the first sock with my Waterlilies yarn , and just for yuks, I tried it on even though it was basically just a tube sock. Much to my surprise, it fit really well, even without a heel. Who knew? So, that got me thinking: what if I just didn't add the heels?  I never thought a tube sock would actually fit nicely, but I genuinely like the fit, so...why spend time to add the heels? As the saying goes, if it ain't broke, don't fix it.... Let's say I decide not to add heels once the second sock is done - there will still be placeholder yarn for the afterthought heels, as you can see above, so should I leave it in and just weave in the ends? Or should I remove it, put the live stitches back on needles and at least graft them together using more of the Waterlilies yarn? I plan on mulling all of this over as I knit the second sock, and I'd love to hear your opinions of what you think would look best (or if you think this whole "n...