When you go yarn shopping, have you ever noticed that there are different shapes and sizes for the skeins of yarn on the shelf? Yarn for knitting or crocheting is most commonly sold in three different forms: balls, skeins, and hanks.
As the name would imply, balls are a nice, round shape, and you can begin working with the yarn directly from them. Similarly, skeins also come ready to knit (or crochet); the yarn in a skein is more loosely wrapped than a ball, to create a more oblong shape.
Hanks of yarn are wound into a large circle and then twisted; these yarns need to be wound into a ball before use.
There are three ways to wind hanks of yarn into cakes which can be used for knitting or crocheting, and I'll give you an overview of each one on today's post!
To get started, open the hank and remove any ties that might be securing the skein (these are often on hand-dyed yarns to prevent the skeins from becoming tangled messes during the dye process):
If you don’t have any equipment handy, don’t fear! You can use the back of a chair or have a friend hold the skein for you like so (I've even used my own two feet in a pinch!):
I start by wrapping the yarn around my fingers:
Once I have a good base, I remove the yarn from my fingers and start wrapping the yarn around at different angles to create a round ball to work from. It ends up looking like this:
A Nostepinne is one of the original ways to wind a ball of yarn, and there are many interesting (not to mention affordable) nostepinnes you can buy - here, I'm using one from Knitter’s Pride. There's a little bit of learning curve with this tool, but it does produce a much nicer-looking yarn cake than winding yarn by hand. Plus, it's also portable - you can easily stash it in your knitting bag or suitcase so that you're ready for any yarn-winding emergency.
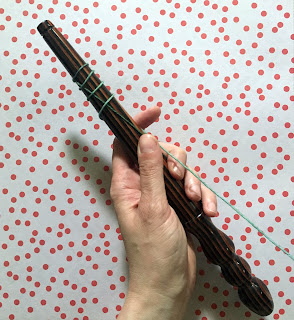
Again, you'll want to use a yarn swift or have a friend hold the skein while you wind the yarn. I like to keep things simple by holding one yarn end against the nostepinne, then wrapping the yarn around a few times to secure it like so:
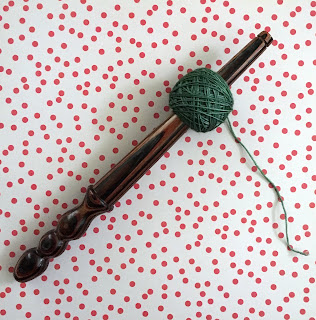
Then, I start winding the yarn from the bottom left corner to the top right corner (you can also do the reverse if it's easier for you) while slowly rotating the nostepinne AT THE SAME TIME. This allows the wraps of yarn to build up evenly to create that yarn cake shape we all know and love! I'm still getting the hang of it, but here's my finished cake:
My personal favorite way to wind yarn is using a swift and ball winder. While it does require a bit of an investment, the time you save is priceless in my opinion! Not only that, but you don't have to depend on the availability of a patient human to wind the yarn, plus you can also make picture-perfect cakes every time.
There are two keys to successful winding:
1. Making sure there's enough space between your swift at the ball winder.
2. Not winding too fast.
Here's a good video to walk you through the steps in greater detail:
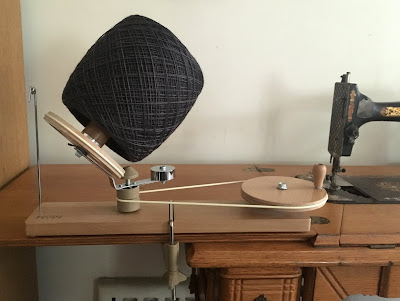
A few years ago I upgraded from a plastic/metal yarn winder a swift (similar to what you see in the video above) to a swift and ball winder from Knitters' Pride. According to the website, the ball winder can hold up to 1 pound of yarn, which I admit - I was a bit skeptical about. But when I needed to wind the ginormous skein of Miss Babs Katahdin that I bought at Stitches midwest earlier this month, I decided to put it to the ultimate test.
The skein isn't quite one pound (it's just over 14 oz.) - but it's a whopping 1402 yards of fingering weight yarn. That's no joke...I mean, check out this huge yarn cake:
Do you have a favorite way to wind your yarn hanks? I'd love to hear about it in the comments!
As the name would imply, balls are a nice, round shape, and you can begin working with the yarn directly from them. Similarly, skeins also come ready to knit (or crochet); the yarn in a skein is more loosely wrapped than a ball, to create a more oblong shape.
Hanks of yarn are wound into a large circle and then twisted; these yarns need to be wound into a ball before use.
 |
| Left: mini skeins from October House Fiber Arts; Right: Katahdin from Miss Babs |
There are three ways to wind hanks of yarn into cakes which can be used for knitting or crocheting, and I'll give you an overview of each one on today's post!
To get started, open the hank and remove any ties that might be securing the skein (these are often on hand-dyed yarns to prevent the skeins from becoming tangled messes during the dye process):
Winding Yarn by Hand
If you don’t have any equipment handy, don’t fear! You can use the back of a chair or have a friend hold the skein for you like so (I've even used my own two feet in a pinch!):
I start by wrapping the yarn around my fingers:
Once I have a good base, I remove the yarn from my fingers and start wrapping the yarn around at different angles to create a round ball to work from. It ends up looking like this:
Pros: Good way to get to know your yarn.
Cons: Takes a long time, can't make a center-pull ball (or at least, I haven't figured out how to!).
Winding Yarn with a Nostepinne
A Nostepinne is one of the original ways to wind a ball of yarn, and there are many interesting (not to mention affordable) nostepinnes you can buy - here, I'm using one from Knitter’s Pride. There's a little bit of learning curve with this tool, but it does produce a much nicer-looking yarn cake than winding yarn by hand. Plus, it's also portable - you can easily stash it in your knitting bag or suitcase so that you're ready for any yarn-winding emergency.
Again, you'll want to use a yarn swift or have a friend hold the skein while you wind the yarn. I like to keep things simple by holding one yarn end against the nostepinne, then wrapping the yarn around a few times to secure it like so:
Then, I start winding the yarn from the bottom left corner to the top right corner (you can also do the reverse if it's easier for you) while slowly rotating the nostepinne AT THE SAME TIME. This allows the wraps of yarn to build up evenly to create that yarn cake shape we all know and love! I'm still getting the hang of it, but here's my finished cake:
Pros: Portable, good way to get to know your yarn, relatively inexpensive equipment investment, center-pull balls of yarn are possible.
Cons: Requires some practice, takes a long time.
Winding Yarn with a Swift & Ball Winder
My personal favorite way to wind yarn is using a swift and ball winder. While it does require a bit of an investment, the time you save is priceless in my opinion! Not only that, but you don't have to depend on the availability of a patient human to wind the yarn, plus you can also make picture-perfect cakes every time.
There are two keys to successful winding:
1. Making sure there's enough space between your swift at the ball winder.
2. Not winding too fast.
Here's a good video to walk you through the steps in greater detail:
A few years ago I upgraded from a plastic/metal yarn winder a swift (similar to what you see in the video above) to a swift and ball winder from Knitters' Pride. According to the website, the ball winder can hold up to 1 pound of yarn, which I admit - I was a bit skeptical about. But when I needed to wind the ginormous skein of Miss Babs Katahdin that I bought at Stitches midwest earlier this month, I decided to put it to the ultimate test.
The skein isn't quite one pound (it's just over 14 oz.) - but it's a whopping 1402 yards of fingering weight yarn. That's no joke...I mean, check out this huge yarn cake:
Pros: Fastest option, produces beautiful center-pull cakes, easy to learn.
Cons: Requires a sizable up-front investment in equipment, not as portable as other options.
Do you have a favorite way to wind your yarn hanks? I'd love to hear about it in the comments!


Comments
Post a Comment